Making Jasper
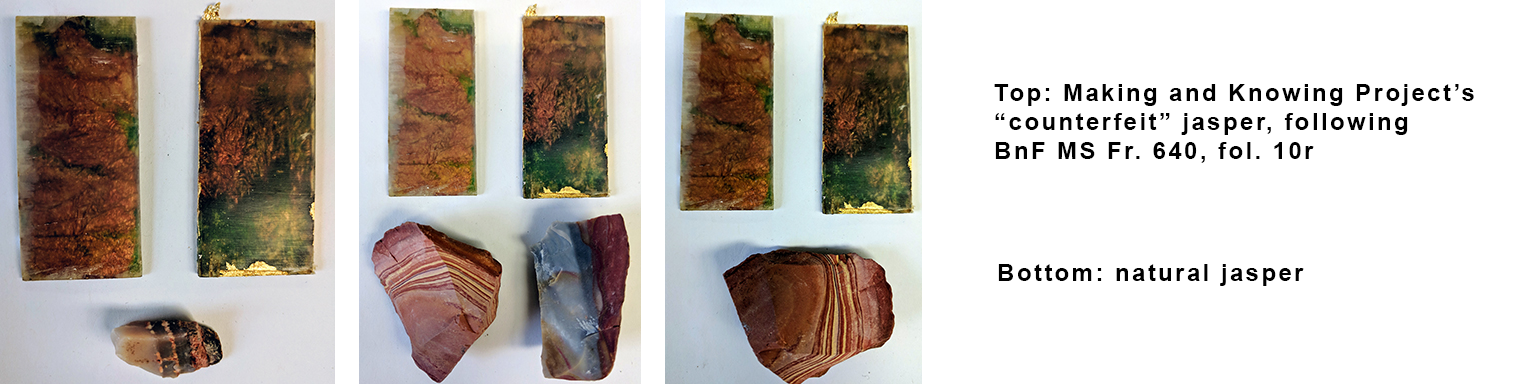
Ms. Fr. 640 contains just one entry about jasper, early in the manuscript, on fol.10r. The entry is entitled “Counterfeit jasper,” but the author-practitioner does not mean “counterfeit” in the modern sense of being fake, fraudulent, or deceitful. Rather, he uses “counterfeit” in the early modern sense of being a portrait – a faithful representation of jasper. Moreoever, as the Making and Knowing Project has come to discover, his process of making jasper, with its cumulative layering of materials one atop the other, recapitulates his understanding of how the striated rock was formed in the earth. In other words, by making jasper, the author-practitioner was attempting to extend his knowledge about natural history. For him, making became a way of knowing.
To make or “counterfeit” jasper, the author-practitioner instructs:
Take horn from which one makes lanterns, quite thin, & underneath make the figure of your jasper, cornalines, & other stones, which will be a work more appropriate than on glass, which is too shiny. And the horn presents a luster & fatty polish like jasper.
You know how, with scrapings of the said horn, roses can be imitated. The
horncolors for this jasper want to have a base with clear turpentine or spike lavender varnish.And colors matte in body are not so appropriate here, although they are very beautiful. One needs to oil the unpainted reverse with spike lavender oil.
The entry is also annotated above with the line, “Thin glass for this effect is very beautiful.” and in the left margin a longer note:
You can encrust beds with it & on the joints you can throw the filings of talc or of pins on the fresh cement of the said joints. One needs to join them with gum ammoniac soaked in vinegar. To better counterfeit mottled jasper, apply wool with thick hairs dyed in diverse colors & intermingled. After you have layered all the colors, scrape oblique lines on them, then layer gold & silver leaf. If you layer on the horn colors of turpentine, give it a base of silver or of tin leaf. You can also file horn & mix it with strong glue, & layer it onto the joints of the piece of horn, then even it with a joiner’s plane.
Learning Objectives
Over a number of years, the Making and Knowing Project experimented with this recipe, learning through iteration. At times, students focused on certain steps in the process (for example, learning how to plane horn), and the project team also returned to and refined processes. Our investigations of jasper are shared here as a model of how you might engage with a process and material in many different ways over time. It is not necessary to complete a recipe to learn from it. You and your students or collaborators might well learn from building upon one another’s investigations, or participating in one part of a larger process. We invite you to approach hands-on research and teaching in this spirit, and provide some resources below for you to iterate with us on counterfeit jasper, or as inspiration for you to build open-ended investigations on these (or indeed other) materials or recipes.
Themes
Iterative learning, imitation, decorative arts, craft, ephemeral art
Safety Considerations
This requires working with sharp tools and ventilation. You will be working with some hazardous materials (varnishes contain volatile substances, cutting horn generates particle dust).
Overview
Steps in the Process
The process of making imitation jasper described in Ms Fr. 640 in the body and marginal texts can be summarized as follows:
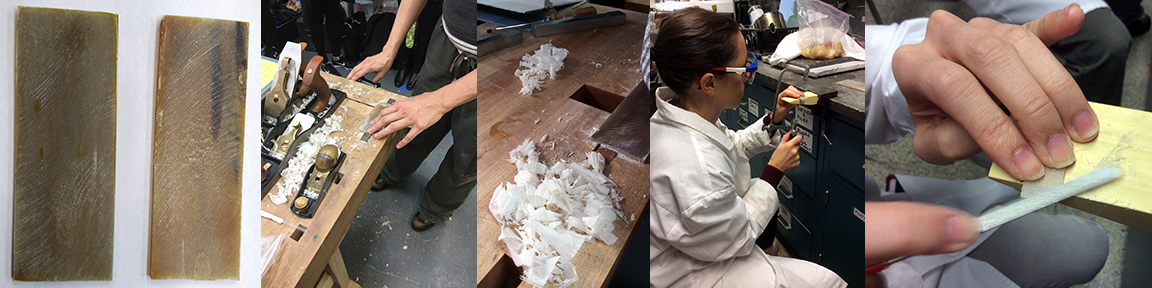
Part 1. Planing and cutting thin sheets of horn
Part 2. Paint sheets of horn with varnishes of various colours
Part 3. Apply unspun wool fleece to the varnished side and/or scrape oblique lines into the varnish
Part 4. Apply metal leaf
Part 5. Oil the front side of the horn sheets with spike lavender oil to increase transparency
Optional further experimentation
As noted by the author-practitioner, you could try this process using “thin glass” as an alternative substrate for (or perhaps in addition to?) horn. The Making and Knowing Project did not experiment with this. As in all reconstruction research, there is always space for further trials.
The author-practitioner also mentions a side-project of fashioning a rose out of the leftover horn planings. See section below.
Materials
- Horn (we used buffalo horn)
- Spike lavender oil varnish (see separate instructions for making)
- Turpentine varnish (see separate instructions)
- Pigments, transparent rather than opaque (e.g. verdigris, lakes, smalt, azurite, malachite rather than earths, leads, carbon black, soots, chars)
- Unspun wool fleece of various colors (or wool yarn, unspun and teased out)
- Gold and silver leaf or transfer gold/silver (choice may depend on how dry the varnish layers are)
- Spike lavender oil (for oiling the undecorated front)
- Mineral spirits (for clean-up)
Tools
- Plane
- Bench anvil pin clamp
- Jeweler’s saw
- File
- Newspaper (to cover work surface)
- Glass plates
- Mullers
- Droppers
- Palette knives
- Paintbrushes
- Sharp metal tools (e.g., dentist tools, etching needles)
Making Process
Step 1. Planing and cutting horn
Materials
- Horn (we used buffalo horn)
Tools
- Plane
- Bench anvil pin clamp
- Jeweler’s saw
- File
Instructions
- Set up the sheet of horn secured in place at a workbench.
- Use a small plane to take the sheet of horn down to about 2 mm thickness. Be sure to collect the shavings to use in the side-project of fashioning a rose out of the horn planings.
- To cut the sheet into smaller pieces,
- Set up a peg on the countertop, tightly secured.
- Secure an appropriate blade in the jeweler’s saw.
- Scrape lines across the length of the sheet of horn to indicate where cuts will be made.
- Put on a protective mask to protect nose and mouth from horn dust when cutting with the saw.
- Following the lines, use the jeweler’s saw to cut the horn into rectangular sheets, using an up-and-down motion.
- Use a file to smooth down the edges of each rectangular sheet.
- See Field Notes on horn preparation from the Making and Knowing Project’s Jasper Making.
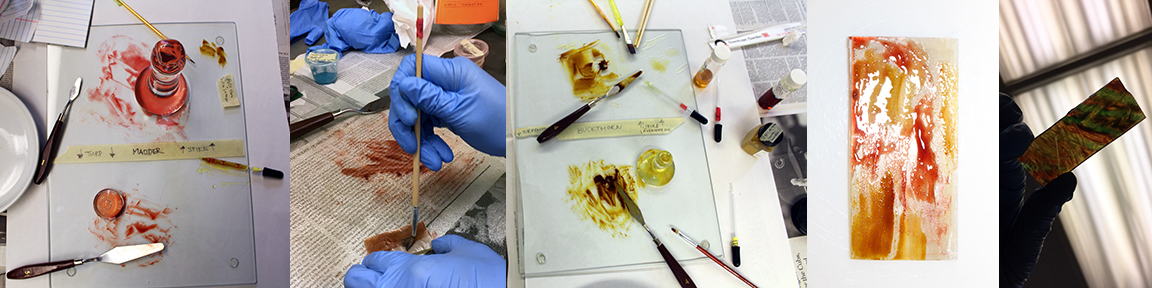
Step 2. Painting horn sheets with colored varnish
Materials
- Thin sheets of horn (prepared per Step 1)
- Unspun wool fleece of various colors (or wool yarn, unspun and teased out)
- Spike lavender oil varnish (see instructions on the page “Making Varnishes”)
- Turpentine varnish (see instructions on the page “Making Varnishes”)
- Pigments, transparent rather than opaque (e.g., verdigris, lakes, smalt, azurite, malachite, rather than earths, leads, carbon black, soots, chars)
Tools
- Newspaper (to cover work surface)
- Glass plates
- Mullers
- Droppers
- Palette knives
- Paintbrushes
- Sharp metal tools (e.g., dentist tools, etching needles)
Instructions
The instructions in Ms. Fr. 640 suggest spike lavender oil varnish and turpentine varnish for painting. You can try either or both.
- Set up your workstation and cover it with newspaper for easy cleanup.
- On a glass plate, mix 1g ground pigment with 2-3 drops of varnish (spike lavender or turpentine) using a glass dropper. Use the muller and palette knife to grind and mix the pigment well.
- Using a fresh paintbrush, paint one entire side of one rectangular piece of horn.
- If desired, repeat with other combinations of other pigment and either of the varnishes. You can also experiment with striating or layering different colors on the same piece of horn.
Step 3. Application of wool fibers
Materials
- Unspun wool fleece of various colors (or wool yarn, unspun and teased out)
Instructions
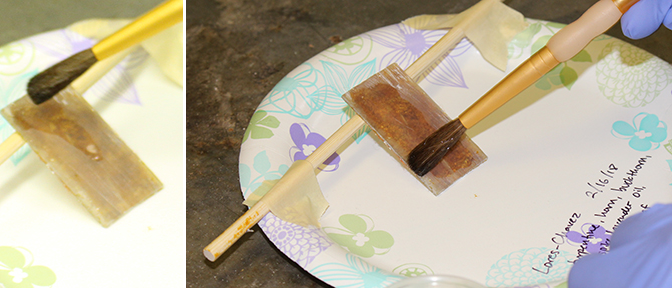
- When one side of the horn sheet is completely painted, press wool fibers into the wet paint and arrange them to give an effect of veining or marbling.
- Using a sharp metal tool, scrape oblique lines into the varnish to give an effect of veining or marbling.

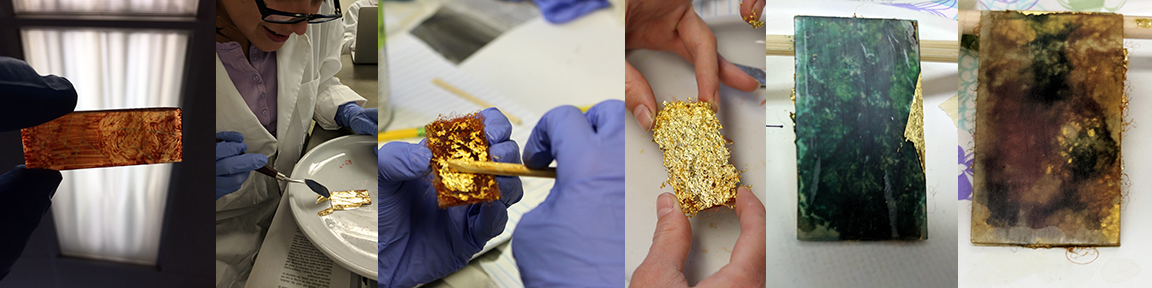
Step 4. Metal leaf application
Materials
- Thin sheets of horn painted with varnish and transparent pigment (prepared per Step 2)
- Gold and silver leaf or transfer gold/silver (choice may depend on how dry the varnish layers are)
Tools
- Paintbrushes
Instructions
The manuscript mentions using gold, silver or tin leaf as a reflective backing for the painted horn.
- Remove the sheet of transfer gold leaf from packet, being careful not to disrupt it and raise it off of the paper backing.
- Press one half (lengthwise) of the painted side of one sheet of horn against the transfer gold leaf. Apply pressure to make sure that the horn is really pressing against the gold leaf.
- Carefully turn over the sheet of horn and the entire square of gold leaf. With a finger, rub the transfer gold leaf against the horn to further secure the gold onto the oil or varnish of the hold.
- Remove the excess of gold leaf around the piece of horn, leaving behind the piece applied to the varnish.
- Using a clean paintbrush, sweep away extraneous pieces of gold leaf that have not adhered to the horn. These extra pieces can also be swept onto any gaps in the transfer gilding on the sheet of horn. A gentle sweeping motion in one direction should do it.
Notes
- For at least one sheet of horn, consider gilding the entire sheet.
- Consider using the metal leaf in combination with the wool. You have two options:
- move the yarn that you adhered to the varnish, being careful to ensure that the varnish retains its marbled effect from where the wool had pushed into it.
- Apply metal leaf over the yarn and varnish. The surface will be uneven, but the leaf should adhere nonetheless.
Step 5. Oiling the jasper
Materials
- Thin sheets of horn painted with varnish and transparent pigment (prepared per Step 2 and 3)
- Spike lavender oil (for oiling the undecorated front)
Tools
- Paintbrushes
Instructions
- Using a clean paintbrush, apply spike lavender oil to the front (undecorated) side of the horn. The oil will fill in the dry micro-cracks on the surface of the horn, giving it sheen and translucency.
Side-Project: Fashioning a Rose from Horn Shavings
The “Counterfeit Jasper” recipe on fol. 10r notes:
You know how, with scrapings of the said horn, roses can be imitated.
Further down the page, another entry, “Roses,” elaborates further:
These are counterfeited either with the scrapings of horn used for lanterns, or with scrapings of parchment, very clear & delicate & dyed & employed as you know.
The author-practitioner suggests that the waste product from the production of lantern panels or “counterfeit” jasper can be used to make imitation roses. In both entries, the author-practitioner assumes that the reader already knows how this is done (“you know how,” “as you know”). Needless to say, this knowledge is lost. The Making and Knowing Project shares one reconstruction below (painting rather than dyeing the shavings), but feel free to experiment!
Materials
- Shavings left over after planing the horn (per Step 1)
- Red pigment (e.g,. madder lake, Venice lake)
- Walnut oil
- Turpentine varnish (see instructions on the page “Making Varnishes”)
Tools
- Glass plates
- Mullers
- Palette knives
- Droppers
- Paintbrushes
Instructions
- On a glass plate, grind the pigment with a few drops of walnut oil until it forms a smooth paint. Use the muller and palette knife to grind and mix the pigment well.
- Add a few drops of turpentine varnish to the paint and continue to mull until it is incorporated and has the consistency of a thin glaze.
- Use a paintbrush to apply the red glaze to the horn shavings. Apply additional coatings to achieve the desired depth of color. The glaze will make the shavings slightly more pliable.
- Following the natural curls of the shavings, arrange them in a shallow bowl so that they resemble the unfurling petals of a rose.
Resources
- Ana Estrades, “Jasper Imitation on Horn.”
- Isabella Lores-Chavez, “Imitating Raw Nature.”
- Pamela H. Smith and Isabella Lores-Chavez, “Counterfeiting Materials, Imitating Nature,” in The Matter of Mimesis: Studies of Mimesis and Materials in Nature, Art and Science, ed. Marjolijn Bol and E.C. Spary, Studies in Art & Materiality 7 (Leiden: Brill, 2023), 27–53. Open-Access Download.
- Naomi Rosenkranz and Pamela H. Smith, “Making and Knowing: Reconstructing an Author-Practitioner’s Epistemic World and Material Imaginary,” in Cultural Heritage 360, special issue of Endeavour, edited by Tianna Helena Uchacz, Giles Gasper, and Stephen J.C. Taylor, expected 2024, preprint.
- Pamela H. Smith, Tianna Helena Uchacz, Sophie Pitman, Tillmann Taape, and Colin Debuiche, “The Matter of Ephemeral Art: Craft, Spectacle, and Power in Early Modern Europe.” Renaissance Quarterly, Volume 73, Issue 1 (2020), 78-131, https://www.cambridge.org/core/journals/renaissance-quarterly/article/matter-of-ephemeral-art-craft-spectacle-and-power-in-early-modern-europe/45366084D72E61713504E59F4AC59E88. This essay provides context about the use of imitation jasper in early modern Europe.
- Making and Knowing Project Jasper Making Field Notes, 2018. This set of notes include the Team’s planning and protocol, informal field notes, and horn planing and cutting process. The steps and instructions above are drawn in part from this record of the Team’s process.